Pages

Showing posts with label Lesson. Show all posts

Friday, August 5, 2011

First Lesson : Basic Step

Hi, guys!
Call me Somi or Avel or Happy,
whatever you want.
This is our first lesson
and it will be about the basic
step to do Photoshop.

I am using Photoshop CS2 right now,
but I used to use Photoshop 7.0.
There is not much difference, but,
I hope amateurs use ver 7.0 first.

Okay, let's open photoshop first!
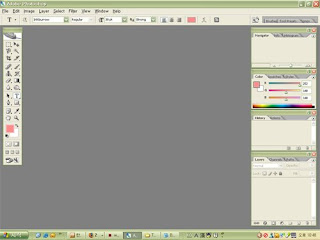

it's quite simple, isn't it?
so, let's see what are the tools.

hehe, i pressed the type tool,
which I use to type something.
That tool is 'horizontal type tool'.

I will name the tools:

Rectangular Marquee /Move
Magnetic Lasso / Magic wand
Crop / Slice
Spot healing brush / Brush
Clone stamp / History brush
Eraser/ Gradient
Blur / Burn
Path Selection / Horizontal Type
Pen / Rectangle
Notes / Eyedropper
Hand / Zoom
Foreground colour / Background colour
Edit it Standard Mode / Edit in Quick Mask Mode
Standard Screen / Full screen with menu bar / Full Screen
Edit in ImageReady

and more and more and more.

Now, you can guess all the functions from the name of all the tools.
Shall we learn how to make simple name tag ?
Second Lesson : Let's make a name tag


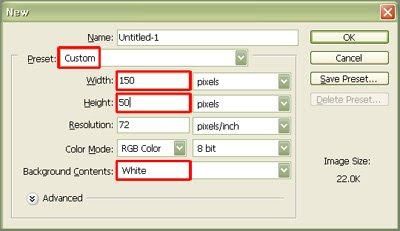
Go to File->New or press Ctrl+N to open new layer.
Please follow the red box :D

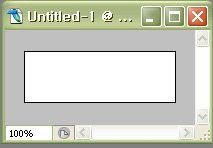
Tada! You opened the new layer!
Now, lets move our cursor key to
the tool below:


Can you remember the name of this tool?
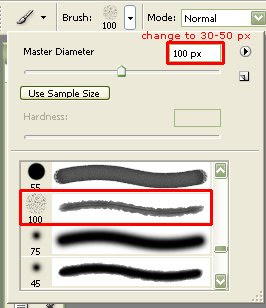
Yes, it's Brush Tool. Please click the tool.


If you clicked it, please look under the menu bar.
Did you find the brush tool there? Now click the arrow under there
and choose your favourite brush.
I selected that brush and I recommend that.
If you chose that, please adjust the size (px).
Choose your favourite colour, then press Shift button
and draw on the surface.

I did pink, yays! :D
did you get this?

Now, press this Horizontal Type tool
and write your whatever in that brush drawn on layer.
I recommend Verdana 10px None.


If you wrote it, yay, it's done :D!
Okay, blogger.com quality is very funny.
Next lesson, we are going to learn how to write
use brush well. We are going to write something :D
Okay, well done, and please click url down there
to see better quality of works & other banners.
Thanks.

http://i283.photobucket.com/albums/kk316/avel_princess/avel_nonmovingbanner_1.jpg
Non-moving Avel Banner
http://i283.photobucket.com/albums/kk316/avel_princess/nametag_done.jpg
Name Tag sample

Wednesday, August 3, 2011

Third Lesson : Let's add wings on human back

Hello, guys, it's already third lesson !
Okay, I am only the one who's enthu.
Never mind, okay, I added music player!
:D happy ~

Now, we are going to something about
genetic science. We are going to make
butterfly-human:
Butterman!
Nice right :DDDDDD?

Okay, Open your image of person.
It's good to open who is not showing their back.

Press Ctrl+O or double-click the background of photoshop.
Bring your photo.


Now, bring your butterfly wing image.


Press 'W' or click Magic Wand Tool. Click the empty space of wings (white part).


Yeah, something like that. Then press Shift+Ctrl+I / go Select-Inverse and you will see this:


Press 'V' or click Move Tool and drag it to the picture of your model's. You will see something like this:


Click Marquee Tool or press 'M' and select one of the wings to erase away.
To erase away, select the area and press Backspace.


Press Ctrl+T in order to adjust the size and you may tilt it.
Place the tilted/adjusted wing in appropriate place.


Change the opacity which is in your layers window. Opacity->40~50%
Click the eraser tool and erase away the overlapping part.
Change the opacity to 100% again and change the mode to 'Multiply'.
You may change it to other favourite way.


Repeat the above step to make other side of wings.


YAY :D it's done!
we will continue in next lesson, to mix other background images to make it nicer.
okay, good job :D!

Tuesday, August 2, 2011

Fourth Lesson : Adding background image

Open your butter-man :DD image.


Now, open (bring) the image of space background, that I have posted already.


Press 'V' or click move tool and drag the background image to your model's picture.
Now, do you remember how to adjust the size of the picture?
Press Ctrl+T to tilt, adjust the size. Press Enter after you have adjusted the size. Please cover all the picture like this:


Then change the opacity to around 50%.


Press Ctrl+J to copy the layer and you may see that the space image is now much clear.


Now, select the Copied Layer and go to Filter->Render->Lens Flare


You may place the lens flare in your WANTED-place, and I recommend 35mm Prime Lens, as it's very clear than Movie Prime or 105mm. Let the brightness be 100% or you may adjust if you want.


Change the mode to overlay of your Copied Layer and change the opacity to 100%.


Tadaaaa! You managed to finish this! CONGRATULATION!


Good job, guys, next lesson, we are going to learn some more effects,
and stuffs:D
Great job guys, and see you later :D

Fifth lesson : Glittering image

Long time no lesson :D!
Okay, today we are going to do something similar like last lesson.
We are going to make our pictures prettier,
by making it glittering.

Now, I am sure that you know how to open the image you want to.
Press Ctrl+O or double click the background :)


I recommend you to use black-based image today.
I opened a model's image. You can open anything.

Now open the image that you have saved, the black&white flowers.


Now, using this tool , just drag the flower image into your another picture.
You will see something like this:


Now, by pressing Ctrl+T, adjust the size and location/angle and put
it in your wanted-place (:


I did in such way. Now, choose the mode from your Layers window.
Please change it to the Screen / Lighten Mode if your image is black background.
You may change it by following your taste (:


Now, Press Ctrl and at the same time, click the layer 2 (flower image).
You will see that it's surrounded by moving dots like ants.
Now, do not touch anything, just click new layer in your layer window.
It's just beside your trash can icon!

If you did it, press and press Spectrum.


There are two spectrums but I recommend the one with star :D
Now click it, and just drag it!
Now, after you dragged it, change the mode to Overlay.


Now, press Marquee tool and select the edge of the flower picture.
After you selected the area, please go Filter-Blur-Motion Blur


Please adjust the pixels according to your taste.
Then you will see something like this:


Okay, now, press Sharpen Tool and sharpen the flowers and lips!
It will look like it's glittering, and please be careful:
Do not over-sharpen it!


Actually this is all!
If you want to add some pictures and decorate them like what we have
learnt last lesson, please to do so!
I decorated like this:


You may enjoy your own way and if you have any time, please show it to me!
laprincessa_amaryllis@hotmail.com
or
tag me at the tagboard menu and link your own blog where your own
photoshop work is uploaded / posted.

I will go see and tag you as well (:!
Happy Photoshop-ing!

Sixth Lesson : Snow or Rain ?

Hello, there!
I didn't post for too long, I guess.
Okay, we are going to do something very simple for this lesson.
Did you ever see snow in Singapore?
I guess you saw raining, often, but I guess
you just saw artificial snows .

Today, we are going to control weather! YAY :D
OK, not funny.

Shall we start since you guys are not amazed by
my lame-shit? :/

Okay, as usual, please open your image by going to
File->Open / Double Click the background.


I opened this emo guy.
I kinda like his adidas shoes :/
Okay, whatever!

Now please new add layer and click the paint bucket tool. [:
I am sure everyone know how to add layer and click paint-bucket tool.

Okay, fill the new layer with black colour, please.


Now, please go to
Filter->Noise->Add Noise.


Please make sure that it is monochromatic [:
and GAUSSIAN!


Next, please go to Filter->Blur->Gaussian Blur.

Around 0.4~0.7 pixels (:


Then, go to Image->Adjustments->Threshold


Now adjust your own pixels.


Then you will see something like this:


Now, go to Filter->Blur->Motion Blur.


For Snow.


For Rain.


But this depends on your taste, as well!

Then you will see something like this:


Sorry for no captures this onwards.
Please go to Image->Adjustments->Bright/Contrast.
Adjust your own contrast&brightness , but please do lower the brightness and higher the contrast to show the white lines more.

Change the mode to Screen.

Then you will see the photo with rain/snow (:


Thanks. I know it's boring sials X:
But next lesson is changing ppl's face, like what TIMO suggested me [:
Okay, off! NIGHTS!